Archive
TIPS EXPERIENCE FROM THE FIELD ON DESIGNING A PIXELSENSE APPLICATION
Since the release to market of the first Microsoft Surface device (Aka Surface V1) and the today Samsung SUR40 with Microsoft PixelSense technology, I have been working on building different types of application for such devices. By looking a bit behind (even if I am not used to do that in general) I have explore and validate different form of approach and rules on such technology , in order to bring to ending customers what they were really expecting to get.
Those rules and guide lines that I have experiment during all those past years, this is something that I will describe here. It has perfectly work in all my projects and could be apply or adjust in order to cover why not yours.
Rules 1 : Understanding customer objectives
One of the most important rule in my mind is to really understand main objectives of your customers, on having a dedicated PixelSense application. At first it might sounds an evidence but when you look deeper it is the key point entry. This understanding will indicate the type of application that you are going to build and set up. Depending on customers objectives the application interaction and design goal will be totally different and you will be able to setup a compromise between the “Woww” effect and application performance.
Rules 2 : Always remember basic questions before anything else
- What is the purpose of integrating the device in a selected location?
- Does the location is suitable to receive the device? ( lighting condition, traffic,..)
- Who will be your application users?
- What type of application will be more suitable based on Rule 1
- How the environment will be ? ( colors, style, branding,..)
Rules 3 : Learn from those who have tried before
Do not jump too quickly into programming your design, but instead raise your head and takes some time to explore what is already existing. To help developers, the Surface team has written an important set of documents to puts you in the right track. The meeting point is the Microsoft PixelSense Design and Development. The Surface SDK 2.0 is the set of tools and sample that will help you building an application but keep in mind that any good programmer can use and understand an SDK but designing a great application is another story and this is the point where you will spend most of your time in a project.
Rules 4 : Forget what you have previously learned on designing traditional application
For some, it is difficult to jump to a new design approach and they always refer to what they have done before and wish to get the same result. You cannot imagine how many times I had to explain to customers or design agency (most of them coming from the web) that the design approach of an application in PixelSense is totally different. This is something where you need to explain again and again until the point you manage to convince them and established a full trust relationship, relying on the experience you provide.
“It takes time to build a great experience, so start with simple thing that you can validate easily”
Your successful application will start from the Microsoft® Surface® 2 Design and Interaction Guide that you absolutely need to cover and get a better idea of what all of this means.
Rules 5 : Do not hesitate to go back to school with your favorite tools
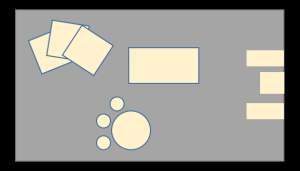
When you have validated the objectives of your customer application define in Rule1, your first favorite tool on your application design will be a pair of scissors and sheets of papers.
During my first application design, I remember the time where I was starting right away my application interface by opening visual studio and start creating windows, controls… When building application for PixelSense this approach will definitely make you lose a lot of time and effort.
- Build a preliminary brain storming with your team on the main aspect and key point of the application
- List on a white board all crazy ideas you might have on your project ( you cannot imagine how a crazy idea can became an excellent one when it is added to others)
- Draw main user interface sketch flow without going in details
Now it’s time to go back to school. Simply remember the time when you was at the kinder garden.
- Take your scissors and paper and start to build what you think your interface can be
- Use your paper as it was the application itself
- Review the size of element if you think they are not correct
- Validate your preliminary design based on what you visually see
Measure each validated visual by keeping in mind that 1cm ~= 22 pixels
“Do not imagine that the time spend around the device with your scissors is useless. It will save you a lot of tedious effort on sizing your visual element based on content flow”
Rule 6 : The Woww factor against application performance
Who have never start to think of his application by already imagine the type of different animation that could be done in order to bring to the application the famous Woww effect ?
Let me stop a while on this simple question: Does “Wow effect” really means animation?
Absolutely not, and this is one of an important point that comes to me when designing an application.
“What my customer is really expecting when he was telling me “Make it wow”
In all of my first PixelSense project, I was permanently thinking of that 3 words and with the time, they disappears from my though for the simple reason that this famous wow factor will come naturally by bringing to live customers mains objectives.
The success of an application will be identify when your customer will start to use your application and will naturally pronounced one word: “Woww”.
Points that make me talk about this are essentially based on followings:
- Too much animation will kill your application
- Reserved animation for content transition and make it fast enough for rich experience. For example an opacity rendering should not go over 0.5 s.
- Do not overload your application for unnecessary things that brings no added value for the general concept
- Always gives priority to application performance
Rule 7 : Avoid using “Forever” storyboard on TagVisualizer
This is one of the rule I recently try to explain to the final customer on one of my last project. As every potential customers, they took major of their ideas from different videos they could catch on the web and explore different application type that can exist, until one of them could be apply to their own use.
So far nothing special, instead a normal behavior when you are new to this world of interaction. The main part of the application was to interact fully with different objects and bring respective content. Nothing special either in that sense except one single request that makes me start to doubt a bit: Each object visual was requested to be animated during the whole presentation of content.
We start to build the requested animation which was based on quite many different layer of successive animated object in different time line. To reach the customer demand we had to set up no more than 8 different storyboard to reach the goal. So far so good we get the animation in place and it behaves as customer expected to get it:
- The object his place on the table
- Different circle object appears around the object and rotate asynchronously
- So particles moves around illustrating user activities during the whole time object was on the table
That was working quite nicely until the time we place more similar object on the table. At that time we could easily notify the weak response of the application during content manipulation. My first doubt start to come true and I could verify this by exploring the CPU usage which reach over 85%.
After some different testing, by simply modifying the storyboard animation to run only for few seconds, the CPU usage drop to 45%
Of course there is not only the fact of stopping a storyboard with make such measure possible but that was the goal of this single test only. Having effect on storyboard consume a lot of resource as well and can be avoided whenever possible.
Rule 8: Always bring alternative to object interaction
Interacting with object is the must have feature for a PixelSense application offering better user experience in a natural way. Objects gets build according to the impact and image to be deliver to the audience and they are in close relation to direct information content attached.
I have been face to a personal bad experience in an earlier application during an event where we bring some nice object specially built to interact with the application I was showing. At the beginning it was cool until the time you let visitors playing around the table and suddenly discover that some objects are not anymore present.
“A missing object should not avoid accessing to it’s initial content”
I do not know what I get in mind when I was preparing the application, but I get a strange feeling that I had to be able to access object content without the object. And this is what I have done and saved my demo at that time.
Rule 9 : Keep track of your main application information
PixelSense application goes to different state during the run and provide different useful information. Keeping track of those information will help you during the whole application level to get those states available at any time.
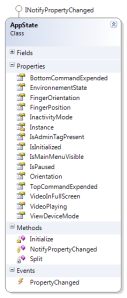
Here is below one sample class model we used to store such information during the whole application life time:
The main interesting thing here is that this class is a part of a MVVM architecture and its properties can be accessible at any time.
Rule 10 : Do not hesitate to disable unwanted touch input if needed
After releasing an application and deploy it to the customer location, I always spend time to clearly look at users and the way they interact with the application in order to bring fine tuning during validation process on site. During that phase, I write down all that works as well as all that does not work.
I was of course expected different type of people around my application but also people wearing different type of clothes.
“Why am I talking about clothes here as we are talking about designing an application? “
Well, have you ever present the result of your application to your manager and ask him to try it? I am sure yes and at that time you have also notice that his long tie touching the screen disturbed his interaction with requested content. This is what could happen in real as well, as you are not expected to wear only tee-shirt to use your application correctly.
At this time you need to adjust you application in the environment it is used. For such you simply need from your main application windows to disable all touch input that your application do not need.
The following sample is filtering only finger input and store Finger position and orientation in an application state as seen in Rule 9:
Private void SurfaceWindow_PreviewTouchDown (object sender, TouchEventArgs e)
{
If (e.Device.GetIsFingerRecognized ())
{
this.contactPosition = e.Device.GetPosition (this);
this.contactDegreeOrientation = e.Device.GetOrientation (this) +90;
AppState.Instance.FingerOrientation = this.contactDegreeOrientation;
AppState.Instance.FingerPosition = this.contactPosition;
}
}
With this simple code, the big tie will not be seen any more as a touch input.
Rule 11 : Use a single SurfaceWindow for better portability and flexibility
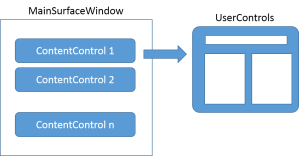
In PixelSense application design and WPF in general we should forget the multi window approach and going more to a single Window showing different type of content as illustrated below:
This architecture will offer flexibility and easier portability. With such approach we have a single main input entry for the whole application and content type gets displayed based on different criteria and directly activated through data binding. The power of the MVVM pattern here takes all it’s importance.
Let’s keep In mind as well that the Surface SDK 2.0 is compatible with Windows 7 platform. By having one single input window for the whole application the compatibility change of the application for Windows 7 compatibility will be resume only by providing a Surface Window for PixelSense app and a standard WPF Windows for Window7.
The only change to switch between those environments will be done from the App.xaml.cs file by overriding the App_Startup as shown below:
Void App_Startup (object sender, StartupEventArgs e)
{
if (InteractiveSurface.PrimarySurfaceDevice.IsTagRecognitionSupported == true)
{
//define Surface environment
StartupUri = new Uri (@”/PropertySense;component/SurfaceMainWindow.xaml”, UriKind.Relative);
}
Else
{
//define Windows 7 environment
StartupUri = new Uri (@”/PropertySense;component/MainWindow.xaml”, UriKind.Relative);
}
}
Rule 12 : Drag & Drop operation are far from being natural if not shown
During whole application design where drag and drop was in place, I have notice how complicated it is to make such operation intuitive and evident for users when they are in front of your application for the first time.
By this I really mean that you let users manipulate your application and simply see them, without showing or saying anything. We make this simple test where we provide a simple view of photos equivalent as the one below:
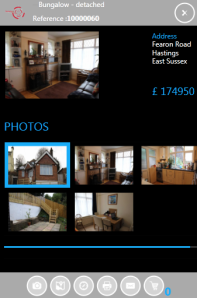
How do you think user does in front of such photos collection?
First they see an horizontal slider so they understand easily that sliding from left to right can give access to more content. The next thing they most all do is touching a picture and wait. All users were doing exactly the same thing until I decide to show them that they can drag.
From that simple test and great feedback results, you need to start to reconsider that interaction. It does not mean that the drag/ drop interaction is bad in this condition but more how to have it more intuitive to users. I start to explore different approach as:
- Add to the interaction the Tap gesture on all element in the list
- Display a Notification message to the user at a certain time
- Display text information inside the visual element being manipulated
- Simulate the drag operation when no activities on the list
From those possible solution, I came from the fact that simulating the interaction with a small storyboard sequence was the most effective way to bring users to repeat that gesture
This scenario keeps me remember all time that people never do what you are expecting them to do in some situation.
Rule 13 : Users are the main source of inspiration
When you have completed the deployment of your application, after a certain time of use, always collect feedback of users manipulating your application. If you have the possibility to go at the location, do not hesitate and simply open your eyes. You will surely see something that you will have never think of or never seen.
“By looking at others using your app, you are already thinking of your next application design”
Rule 14 : Users are the main source of inspiration
When you build a Surface application for Microsoft PixelSense device and have in mind the multi user approach, cleaning teh screen is not necessary the first thing you are thinking of. This comes once again when you look at users the way they use the app. In all application I have made I could notice that users allways open content, but most of the time never close it after they have seen it. This is the reason why after some time of user your main application screen is full of content, the the next user coming to use your app will be confuse on where to start.
Base on that fact we need to try to follow those simple aspect of your content :
- Always provide a close button to be able to close manually your visual content
- Provide an inactivity time out on your content in order that after a certain time of no use, content will be closed automatically
Hoping that I could help you a bit in your reflexion based on my succesfull deployement so far where those rules gets extracted. Of course they engaged only my own personal opinion based on proven scenarios.
How Surface will come to you
Surface is coming soon. Officially annouce ofr the 26th of October 2012. We are all impatient to get one and play with it, buidl great app with it, and more..
But before that ddo you have any idea of the long path before it comes to your door ?
Here is a nice article to gives you more need :
http://www.theverge.com/2012/10/16/3511002/microsoft-surface-inside-look-history
Application Ordering in Surface Application Launcher
Before being able to order your application, the first mandatory requirement is to get all your application you have built that are installed on a device made for Surface must have a corresponding ApplicationName.xml which is used to register you application to Surface Shell. If you do not do the registration process for all your application, they will simply not be visible by the Launcher.
Let’s review briefly how an ApplicationName.xml looks like
From the sample application.xml file above, we will concentrate on the Title, Description, and ExecutablFile entries. As you can see there is no absolute path to physical executable file. The reason for this is that the application.xml file of each application resides in the installation folder of the deployed application.
How the application gets register to Surface shell then?
This operation is done by having a shortcut of that file copied to the %ProgramData%\Microsoft\Surface\v2.0 folder
After you have registered your Surface applications with Surface Shell, they appear in Launcher. By default, all registered applications display in Launcher in alphabetical order (by application title) from left to right.
Application ordering in launcher
By default, each application are organized in the Application Launcher in alphabetical order.
In order to organize application in the launcher the way you want it, there are two different approaches:
- Through the Surface configuration Editor
- Manually by editing the ApplicationOrder.XML
In this post I will describe the scenario we have used in our projects in order to bring some sample use of that ordering process in a flexible way.
Setting up the ApplicationOrder.XML File
Order of application is define by an xml file call ApplicationOrder, that if exist will be available in the %ProgramData%\Microsoft\Surface\v2.0 folder.
In the ApplicationOrder.xml file, you can specify one the two mode:
- The SpecificApps
- The AllApps
We will concentrate on the SpecificsApps in our scenario. The AllApps mode is a combination of SpecificsApps mode and all application registration.
Let’s create for our sample a first file dedicated for kids application for instance and let’s name it KidsOrderApp.xml:
In this file sample we can see that we have register and order 3 applications that will be displayed in the launcher from left to right, in the same order as in the xml file.
Let’s create now a second XML file dedicated to business users and we will name that file BuisinessOrderApp.xml
A flexible Launcher management approach
Now on what we just described you are going to say why the file is not named ApplicationOrder.xml?
You are right in that sense, but the approach that I would like to describe here is to show you the flexibility you can have by playing with different custom files based on your audience.
Let’s imagine the scenario where you want to get visible on the Surface Launcher some application at a certain time period and the others to another time period. The hard way would be that you connect remotely to the unit and then change files you want to see.
A better scenario you can use such file is to use the company domain policies to publish those files automatically. Sure for that approach you need, or your customers need to get the device as part of the company domain.
Once the device is part of the domain you can easily define different scripts which then deploy the corresponding file KidsOrderApp.xml or BusinessOrderApp.xml at the proper time.
For example:
The KidsOrderApp.xml could be deploy from 3 PM to 6 PM into an hotel lobby
– The businesOrderApp.xml could be deploy from 8AM to 4AM and 6PM to 7AM
You can then have a vb script file which does following operation:
– Rename the corresponding file to ApplicationOrder.xml
– Publish the file to the %ProgramData%\Microsoft\Surface\v2.0 folder of the device
– Optionally restart the device or wait for a new session start on the device.
The vb script file will be executed in the respective domain policy rule suitable to cover the need.
I hope that this small post on the approach to ordering application and deploy custom scenario brings you more deployment flexibility. A simple thing that when use efficiently can save your time.
How to debug remotely your Microsoft PixelSense application
Recently I receive request on how to debug a Microsoft PixelSense application from Visual Studio, either from customers or forums.
You will find below experience I get and what works for me in such approcah
When debugging on Microsoft Surface there are 2 ways of doing it:
- By having a developpement environment installed directly on the SUR40 for debugging on the machine
- By using remote debuging
Developpement environement on the unit
Personnaly with past experience on the previous verison of Surface, I was expeimenting the first approach. This solution require some good organisation. Organisation in the sense that installing a complete developpement environement can result in an unstable environment. So of course I would not recommand that approach on a production unit. Before going to such solution you should take care to get in hand a clean backup system in a safe place in order to be able to recover a clean machine. The way I was using it is by creating a deployement image of the SUR40 machine at the desire state I want it. Then keep the generated .WIM file in a safe place. At anytime with that file and a WinPE boot disk I can recover my clean system. Once done you can install whatever you want on the unit and debug directly on it.
Remote debugging
I have spend some times to explore the remote debuggnig on Surface and what do we need for that.
The first thing to consider is the way you are going to identify remote users. In case you connect your unit to your company domain, then user rights will be much easier to manage and hande. In the oposite, you will need to have your developpement account on on your dev machine duplicated on the Surface unit.
Setup the SUR40 environment:
- Ccreate the same account used on your dev machine or login in to your domain with same account
- Install on the VS2010 remote debugger ( 64 bits or 32 bits based on your scenarios ). You can get those binaries from http://www.microsoft.com/fr-fr/download/details.aspx?id=475
- Create a folder that will receive you compile debug bits ( for instance C:\RemoteAppDebug)
- Be sure to get full right on that created folder from your dev account on your dev machine
Set up your Visual sudio environment:
- Open your Surface project
- Compile your project in Debug and copy all bits including symbole files to your RemoteAppDebug directory on your SUR40
- Create a new configuration setting and call it “Remote Debug SUR40”
- Right click on your project and select properties
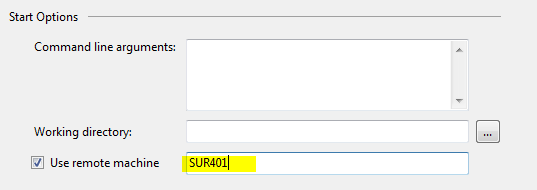
The following picture illustrate setting to define for your remote debugging :
As shown above the important thing is to set the Remote Folder of the SUR40 defined earlier as it would be on the local machine.
What I mean here is if you map for instance the C drive of the SUR to a drive on your machine in will not work.
The next step is to specify that you need to run the debug setting on a remote machine. As shown on above picture be sure to check the “Use remote machine” option and specify the name of your SUR40 in the text box.
In case you are not connected to a domain with your SUR40 unit, you will have to enter here the machine name by passing the account to be used like <username>@Machinename
Start debugging:
When you have all this in place you can now debug your application. For that you need to :
-
Start the Visual Remote debugger on the unit based on the target aplication you deploy ( x86 or x64 )
-
Be sure you can access to the RemoteAppDebug folder from your devlopment machine
-
Press F5 to start debuggin your application
Trouble you might face on :
– Firewal settings which prevent the conection with your remote environment
– Authentification
For those , please refer to recommandation and check settings according to the following information :
http://msdn.microsoft.com/en-us/library/bt727f1t.aspx
IMPORTANT : This debugging scenario allows you to debug you application when the SUR40 is in administrative mode as this request need admnistration priviledge
Microsoft Surface and Microsoft PixelSense
It’s done; Microsoft recently announced its own slate named Surface. Hmmm Surface, does its sounds familiar to you? You are right Surface was dedicated before to the famous Microsoft Surface unit and Samsung SUR40. Due to the introduction of the Microsoft Surface slate Microsoft has review his product branding to avoid confusion. Today the slate market is growing rapidly. Slate world, introduced by Apple now seems to have a serious competitor. After releasing to market the famous Samsung SUR40, Microsoft has surprised many people at the announcement of its slate device. Surface will be powered by different version of Windows 8.This slate is offering both comfort, power and design. As usual, on quite similar technology like Surface Computing, people start to be confused but with the time and expected product impact, I am quite sure that things will be clear after a while.
Microsoft PixelSense is the technology brand used on the SAMSUNG SUR40. The brand Microsoft Surface previously used for the SAMSUNG SUR40 is dedicated now to the new Microsoft slate which will run Windows 8
So for Surface slate stick to the new web site link :http://www.microsoft.com/surface/en/us/default.aspx
Old Microsoft Surface brand became Microsoft PixelSense and links are :
http://www.microsoft.com/en-us/pixelsense/default.aspx
http://www.microsoft.com/en-us/pixelsense/SoftwarePlatform.aspx
http://msdn.microsoft.com/en-US/windows/desktop/hh241326.aspx
Microsoft Surface :
Surface Photos App sample and controls available
After releasing the ModelSelector control, Surface garage release again a sample photo application. The goal of this application is really to show in my mind some interaction principle and way to organise items on screen by still providing rich user experience. This simple app is a good starting point to benefit from for those who get started and want to learn new approach. The behaviour which is cool is the way items gets docked around the screen while not used anymore and releasing at the same time the center screen space which is then free for interaction and avoid confusion.
Except the pure interaction concept there is cool reusable control.
You can download this application from Surface blog .
Once again, whow says that a Surface application need to be complicated for beeing attractive !
Thnaks again for Surface Garage for sharing
how to access Desktop for DefaultSurface user
When debugging an application in SurfaceMode , I often need to check some parameters or define some settings in this environnement but then how to do that. I have notice that the question was coming often and this post describe the steps to do so.
SurfaceMode is a spécific profile under wich Surface application will all run and user has the minimum priviledge under such profile configuration. In certain circomstance you might found the need needed to set some parameters for such profile, like printer setting…
To do so proceed as follow:
- Start the Surface mode and do not omit the check mark with the debug option set ( without this option you will be not able to access other ressources)
- Bring to view the Task Manager by using CTRL-ALT-DEL key combination or short cut CTRL-SHIFT-ESC
- End the following process in the describe order :
- Surface Loader
- Surface Shell
- Attract
- Once process above have been shutdown, then click on File->New Task and start Explorer
You are now on the Desktop of the Surface user profile
Hope it helps
Change Thumb color style from a SurfaceListBox
I have been ask recently in a post where to change the color and general style of surfaceListbox. Basically what will be affected if the ScrollViewer object within the SurfaceListbox. To do so the easiest way is as follow :
- Create an empty Surface project in VS2010
- Open your project withinh Expression Blend
- On your empty main windows add a SurfaceListbox control
- Right click on the Control and select EditTemplate -> Edit Copy
- You are now able to edit the template
The part in the template which is dedicated to the scroll bar is the following . Let’s take the sample of the vertical scrollbar
<!– ScrollBar Vert Thumb –>
<Style x:Key=”SurfaceScrollBarThumbStyle”
TargetType=”{x:Type s:SurfaceThumb}”
BasedOn=”{StaticResource SurfaceHitAreaBaseStyle}”>
<Setter Property=”Template”>
<Setter.Value>
<ControlTemplate TargetType=”{x:Type s:SurfaceThumb}”>
<ControlTemplate.Resources>
<Storyboard x:Key=”Touch”>
<DoubleAnimation Duration=”0:0:0.05″
Storyboard.TargetName=”Thumb”
Storyboard.TargetProperty=”Width”
To=”16″/>
<ThicknessAnimation Duration=”0:0:0.05″
Storyboard.TargetName=”Thumb”
Storyboard.TargetProperty=”Margin”
To=”-1,0,-1,0″ />
</Storyboard>
<Storyboard x:Key=”Release”>
<DoubleAnimation Duration=”0:0:0.1″
Storyboard.TargetName=”Thumb”
Storyboard.TargetProperty=”Width”
To=”14″/>
<ThicknessAnimation Duration=”0:0:0.1″
Storyboard.TargetName=”Thumb”
Storyboard.TargetProperty=”Margin”
To=”0,0,0,0″ />
</Storyboard>
</ControlTemplate.Resources>
<Grid x:Name=”Grid”
Background=”{TemplateBinding Background}”
SnapsToDevicePixels=”{TemplateBinding SnapsToDevicePixels}”>
<Rectangle x:Name=”Thumb”
Height=”Auto”
Width=”14″
HorizontalAlignment=”Stretch”
VerticalAlignment=”Stretch”
Fill=”{DynamicResource {x:Static s:SurfaceColors.ThumbEnabledBrushKey}}” />
</Grid>
<ControlTemplate.Triggers>
<Trigger Property=”s:TouchExtensions.AreAnyInputDevicesCapturedWithin”
Value=”True”>
<Trigger.EnterActions>
<BeginStoryboard Storyboard=”{StaticResource Touch}”/>
</Trigger.EnterActions>
<Trigger.ExitActions>
<BeginStoryboard Storyboard=”{StaticResource Release}”/>
</Trigger.ExitActions>
</Trigger>
<Trigger Property=”IsEnabled”
Value=”False”>
<Setter Property=”Fill”
TargetName=”Thumb”
Value=”{DynamicResource {x:Static s:SurfaceColors.ThumbDisabledBrushKey}}”/>
</Trigger>
</ControlTemplate.Triggers>
</ControlTemplate>
</Setter.Value>
</Setter>
</Style>
From the template snipet above we are interresting on the bold section of it.
The background property of the grid element define tha color of the scroll bar.
The Fill property of the Rectangle child element of the grid represent the Thumb color.
Simply define your own style brush and reference them for this 2 properties
Hope it helps
Handling an XPS document in a Scatterview – Surface SUR40
I have recently been in front of a situation where I was looking for a simple way to display an XPS document in a ScatterView without having to go for a new UserControl in my library.
I used to be lazy by default 🙂
So for that i start by :
- Creating a simple Surface 2.0 project in VS2010
- Add a DocumentViewer as a content of a Scatterview
- Load the XPS document into the documentViewer
Sounds so simple right. Now let’s run your project and you will see that DocumentViewer is not responding to touch.
Simple solution to go, as the first solution we should all have primary in mind, try to see if we can hack the original default template of the DocumentViewer.
Yes we could:
- Simply open your project in Blend and edit the current DocumentViewer template
- Look for ContentControl entries and the ScrollViewer element
- Replace the ScroolViewer entries by <s:SurfaceScrollViewer>

From that steps apply the style to your DocumentViewer in your project and run your application . Hmm cool you have a ScrollViewer in a Scatterview and you can scroll pages with vertical scrollbar.
Hmmm, yes but why i cannot scroll my document by panning directly the content naturally.
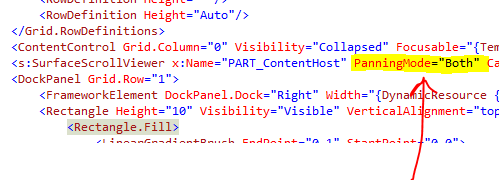
Simple, when you know and after some search, the only thing missing is to set the PanningMode of the SurfaceScrollViewer in the template you define earlier.
Run your application again and now you can manipulate your document page normally with fingers.
Hope it can help others
We use to learn every day simple things which are just nearby your nose 🙂
A full demo project can be download here
regards
Adding Custom Color to your Surface Contacts
Sometimes it is is good to know also simple things under the cover that you would have never though to add to you app until a customer raise that question. The source of the issue was the fact that customer application background was build with quite light colors range and he was simply asking that it could be nice to be able to change the contact color on your surface application.
As all of us may know, for us it might be a useless thing but what customer want customer have.
So for those who want to provide the abilities to affect that contact colors here what you should do.
For that I will use a cool way which will differe from traditionnal code behind approach, instead will use direct binding:
- Define a ressource entry of type string and name it ContactColor
- Provide as a string value the exemple of #FFFFFF ( correspondign to White color)
- From your main window xaml file add the following xaml name space :xmlns :props=”clr-namespace:MyApplication.Properties;assembly=MyApplication”
- Enter the following line to your windows:TouchVisualizer.VisualizationColor1=”{Binding ContactColor, Source={x:Static props:Settings.Default}}” s:TouchVisualizer.VisualizationColor2=”{Binding ContactColor, Source={x:Static props:Settings.Default}}” s:TouchVisualizer.VisualizationColor3=”{Binding ContactColor, Source={x:Static props:Settings.Default}}”>
ContcatColor notify property is populated as follow from code behind :
/// The name of the visualization color setting in the config file.
private const string _ContactColorSetting = “NameOfressourceKey”;
System.Drawing.Color tempColor = System.Drawing.ColorTranslator.FromHtml(GetSetting(_ColorSetting, defaults));
ContactColor =Color.FromArgb(tempColor.A,tempColor.R, tempColor.G, tempColor.B);
An that’s it.
What this binding does is reading the value of the ressource property ContactColor which is bind to a ViewModel property ContactColor of my application and associate that color to each visualizer. By placing that color in a ressource, you can provide an easy way to access it through a configuration tool.
For more inofrmation on TouchVisualizer
A simple thing, will cool effect on your final app
Hoping you will find it interresting





Recent Comments